A refrigerant leak is one of the most common problems in HVAC systems and one of the most costly if left unaddressed. A leaking system wastes money, reduces cooling capacity, stresses the compressor, and releases greenhouse gases into the atmosphere. For HVAC technicians and facility managers, knowing how to detect and repair leaks correctly is a fundamental skill.
This guide covers five proven steps for identifying and resolving HVAC refrigerant leaks, along with the tools, techniques, and best practices that separate effective leak service from incomplete repairs that lead to repeat calls.
Why HVAC Refrigerant Leaks Are Serious Problems
Many homeowners and even some technicians underestimate the significance of an HVAC refrigerant leak. The common assumption is that a system just needs to be “topped off” with refrigerant, and everything will be fine. This approach is wrong and in some cases, illegal.
Refrigerant in a properly functioning system is a sealed substance. It does not evaporate, get consumed, or deplete under normal operation. When refrigerant levels drop, it is always because refrigerant is escaping through a leak somewhere in the system. Adding refrigerant without finding and fixing the leak is like pouring water into a bucket with a hole a temporary fix that wastes resources and accomplishes nothing lasting.
Environmental and Legal Consequences of Refrigerant Leaks
Under EPA Section 608 of the Clean Air Act, knowingly releasing refrigerant into the atmosphere is illegal. This regulation applies to all regulated refrigerants including R-410A, R-22, R-404A, and their alternatives. Violations can result in civil penalties up to $44,539 per day per violation.
Beyond the legal risk, refrigerant emissions have environmental consequences. High-GWP refrigerants like R-410A (GWP 2,088) and R-404A (GWP 3,922) contribute to climate change when released. A system that leaks even one pound of R-404A per year contributes the greenhouse gas equivalent of nearly two tons of CO₂ annually. Proper leak detection and repair is both a legal obligation and an environmental responsibility.
How Refrigerant Leaks Damage HVAC Equipment
Beyond environmental concerns, a refrigerant leak physically damages the cooling system over time. When refrigerant levels drop, the evaporator coil operates at a lower pressure than designed. This causes the coil to become excessively cold, which leads to ice formation on its surface. Ice blocks airflow, which further reduces the heat transfer that the refrigerant needs to absorb. This cycle of low refrigerant → ice formation → reduced airflow can lead to compressor failure.
Compressor failure is the most expensive consequence of an unaddressed refrigerant leak. A residential compressor replacement can cost $1,500 to $2,500 or more in parts and labor. Commercial compressors cost significantly more. The economics strongly favor prompt leak detection and repair over the false economy of simply adding refrigerant.
Step 1 – Recognize the Signs of a Refrigerant Leak
The first step in addressing a refrigerant leak is recognizing that one exists. Systems rarely leak in dramatic, obvious ways. More often, the loss is gradual, and performance degrades slowly enough that homeowners or facility managers may not notice until the system is significantly undercharged.
The most reliable indicators of a refrigerant leak include reduced cooling capacity (the system runs longer but achieves less temperature reduction), ice formation on the evaporator coil or refrigerant lines, unusual hissing sounds near the indoor or outdoor unit, higher-than-normal electricity bills, and warm air from supply registers despite the system running.
Distinguishing a Refrigerant Leak from Other HVAC Problems
Not every symptom of a refrigerant leak is actually caused by one. Several other problems can cause reduced cooling performance or ice formation. A dirty air filter restricts airflow and causes ice to form on the evaporator. A failing blower motor reduces airflow with similar effects. A dirty evaporator coil reduces heat transfer efficiency. Duct leaks reduce the amount of cooled air that reaches occupied spaces.
A competent diagnostic process checks these other possibilities before concluding that a refrigerant leak is responsible. Manifold gauge readings provide the most reliable confirmation comparing measured suction and discharge pressures to the manufacturer’s specified values for the installed refrigerant type quickly reveals whether refrigerant levels are correct.
Step 2 – Choose the Right Leak Detection Method
Once a refrigerant leak is suspected, the next step is finding it. Several leak detection methods are available, each with advantages and limitations. The best approach uses the most appropriate method for the situation and sometimes combines methods for confidence in the result.
The three primary methods are electronic leak detection, ultraviolet (UV) dye testing, and nitrogen pressure testing. Each has specific strengths that make it more or less suitable for different leak scenarios.
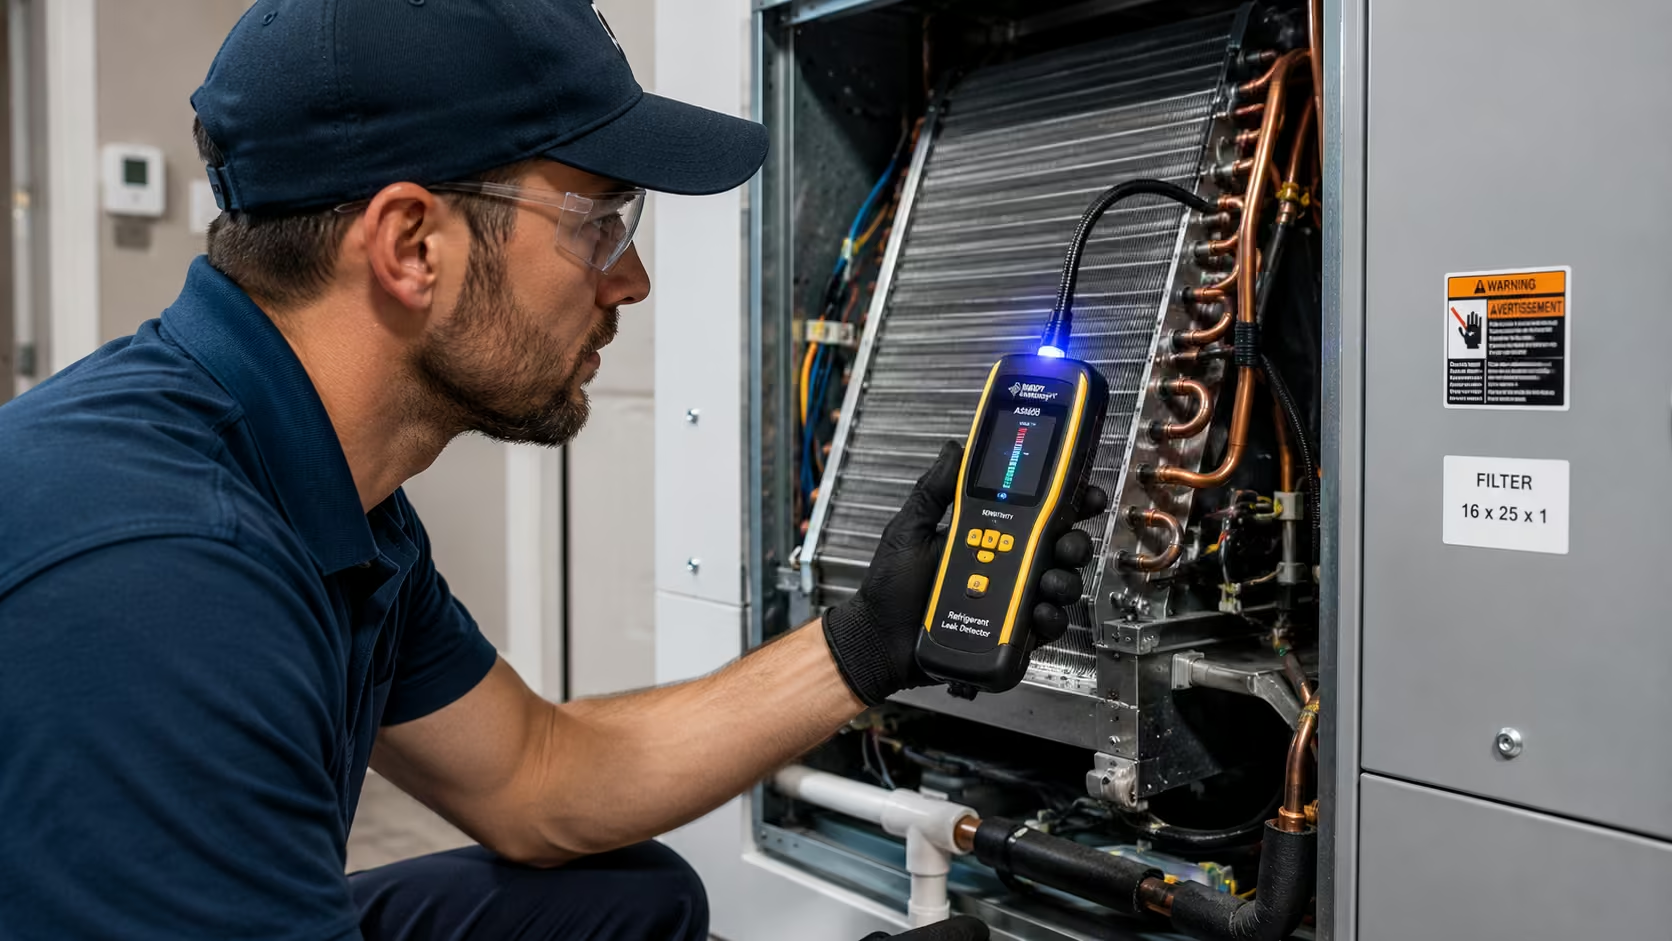
Electronic Leak Detection – The Primary Tool
Electronic refrigerant leak detectors are the most common tool for locating leaks in active systems. These handheld devices detect refrigerant vapor concentrations in the air and alert the technician with audible and visual signals when refrigerant is present. They are fast, sensitive, and non-destructive.
The best electronic detectors for modern HFC and HFO refrigerants use infrared or heated diode sensing technology. These technologies provide stable, reliable detection with minimal false positives from other chemicals. Technicians should use detectors calibrated for the specific refrigerant in the system being tested, as sensitivity and response profiles vary between refrigerant types.
UV Dye Testing for Elusive Leaks
When electronic detection does not conclusively locate a leak which can happen when leak rates are very slow or the leak is in an inaccessible location UV dye testing provides an alternative approach. A small amount of UV-fluorescent dye is injected into the refrigerant circuit. The system runs for a period, and the dye circulates throughout. A UV lamp then illuminates the circuit, making the dye visible as a bright green or yellow glow at leak points.
UV dye testing is particularly effective for finding slow leaks in evaporator coils, which can be difficult to access with an electronic detector. The limitation is time the system must run long enough for the dye to circulate and accumulate at the leak site. This method is also less suitable for systems with HFO refrigerants, as some dye formulations are not compatible with HFO refrigerants. Always verify dye compatibility before injection.
Nitrogen Pressure Testing for Major Leaks
For systems where the refrigerant has been fully recovered either because the system was evacuated for a major repair or because leak rates are too high for the system to hold pressure nitrogen pressure testing allows leak location without refrigerant in the circuit.
The system is pressurized to a specified level with dry nitrogen (never use oxygen or air, which create fire hazards and moisture respectively). The technician then uses a soapy solution or a nitrogen-specific leak detector to find where pressure is escaping. Nitrogen pressure testing is the most reliable method for confirming the integrity of newly installed or repaired refrigeration circuits.
Step 3 – Diagnose the Cause and Location of the Leak
Finding where refrigerant is escaping is only part of the diagnostic process. Understanding why the leak is occurring and exactly which component is leaking is essential for making an effective repair.
Common leak locations in HVAC systems include the Schrader valve cores on service ports, flare fittings on refrigerant lines, the evaporator coil (particularly in systems with acidic condensate or physical damage), the condenser coil (vulnerable to vibration and corrosion), brazed joints in the refrigerant circuit, and the reversing valve in heat pump systems.
Evaporator Coil Leaks – The Most Common and Difficult Scenario
Evaporator coil leaks rank among the most common and most challenging leak scenarios. Condensate moisture exposes evaporator coils, which can become acidic in systems with contaminated refrigerant or excessive moisture. This acidic condensate attacks the copper tubing of the coil over time, creating pinhole leaks.
These pinhole leaks are extremely difficult to locate with conventional methods because the leak rate is very slow and the coil is enclosed in the air handler cabinet. UV dye testing is the most effective method, but even then, the technician may need to remove the coil from the cabinet to access the leak location adequately.
For evaporator coil leaks, the cost-effectiveness of repair versus replacement depends on the coil’s age, the refrigerant type, and the extent of the damage. In many cases, replacement is more economical than repair, particularly for older coils where the same corrosion that caused one leak may soon cause others.
Step 4 – Perform a Proper Leak Repair
Once the leak location is identified and the cause is understood, the repair must be executed correctly to ensure it holds and does not create new problems. The approach depends on the type of leak and its location.
Schrader valve core leaks are simple to repair replace the valve core using the correct tool after recovering refrigerant to reduce pressure. Flare fitting leaks may require retorquing if the leak is minor, or disassembly and reflaring if the fitting is damaged. Flare fittings must be reformed correctly never overtighten them, as this can crack the flare.
Brazing Repairs for Copper Refrigerant Lines
Brazed repairs are required for leaks in copper refrigerant lines and coil piping. Brazing involves using a gas torch to flow a copper-phosphorus or silver-alloy brazing rod material into the joint to create a permanent seal. Done correctly, a brazed joint is stronger than the surrounding pipe.
Proper brazing procedure requires flowing nitrogen through the circuit during the brazing process to prevent internal oxidation. Copper oxidation inside refrigerant lines creates copper oxide particles that damage compressors and contaminate lubricating oil. This nitrogen purging step is critical and is often skipped by less experienced technicians an omission that causes downstream problems.
When to Replace Instead of Repair
Not every refrigerant leak is worth repairing. When a leak is located in a component that is old, has multiple failure points, or requires expensive labor to access and repair, replacement of the component or the entire system may be more economical.
The decision framework should consider the age and overall condition of the system, the cost of the repair including parts and labor, whether the repair addresses the root cause or only the immediate symptom, and the efficiency and refrigerant type of the current system versus what a replacement would offer. A technician who provides honest guidance on this decision earns lasting customer trust.
Step 5 – Recharge the System and Verify Performance
After a confirmed leak repair, the system must be properly recharged with the correct refrigerant in the correct quantity. This step is as important as the repair itself an incorrect charge causes the same performance problems that brought the technician to the call in the first place.
Before adding refrigerant, pull the system down to a proper vacuum (typically 300-500 microns or lower) to remove air and moisture introduced during the repair process. Moisture in the refrigerant circuit causes acid formation and compressor damage, so a thorough evacuation is non-negotiable.
Charging with the Correct Refrigerant and Quantity
The correct refrigerant type must be verified before charging. Never add refrigerant to a system without confirming the refrigerant type adding the wrong refrigerant contaminates the system and may require complete flushing and decontamination.
The correct charge quantity is specified by the equipment manufacturer and is typically listed on the equipment label. Residential systems usually express this as a total system charge weight. Commercial systems often determine charge by superheat and subcooling measurements that indicate optimal operating conditions.
For systems charged with blended refrigerants like R-410A or R-454B, refrigerant must be drawn from the liquid phase of the cylinder to maintain correct blend composition. Charging from the vapor phase causes composition drift that alters system performance. SmartRefrigerants.com supplies virgin-grade refrigerant cylinders in all major types for proper system recharging.
Post-Repair Performance Verification
After recharging, the technician should run the system and verify that it is operating correctly. Measure supply air temperature at multiple registers and compare to expected values. Check operating pressures with manifold gauges and compare to manufacturer specifications for the refrigerant type and current ambient conditions.
Measure superheat at the evaporator outlet and subcooling at the condenser outlet to confirm that the refrigerant charge is correct. Document all measurements and leave the customer with a service report that includes the leak location found, the repair performed, the refrigerant type and quantity added, and the post-repair performance verification results.
8 Frequently Asked Questions About HVAC Refrigerant Leaks
Q1: How do I know if my AC has a refrigerant leak?
Signs include reduced cooling capacity, longer run times, ice on the evaporator coil, higher electricity bills, and warm air from supply registers. A technician with manifold gauges can confirm with operating pressure measurements.
Q2: Is it illegal to vent refrigerant?
Yes. EPA Section 608 prohibits intentional venting of any regulated refrigerant. Violators face civil penalties up to $44,539 per day per violation.
Q3: Can I just add refrigerant without fixing the leak?
This is a temporary fix that does not address the underlying problem. Adding refrigerant without fixing the leak wastes money, harms the environment, and does not prevent the compressor from eventually failing due to undercharge.
Q4: How much does a refrigerant leak repair cost?
Costs vary significantly based on the leak location and the repair required. Simple Schrader valve replacement may cost $100-$200. Evaporator coil replacement can cost $1,500-$3,000 or more.
Q5: How long does a refrigerant leak repair take?
Simple repairs may take 1-2 hours. Evaporator coil repairs or replacements may take a full day. Major leak repairs should always include proper evacuation and recharging time.
Q6: What causes HVAC refrigerant leaks?
Common causes include corroded evaporator coils, loose flare fittings, damaged Schrader valve cores, vibration-induced joint failures, and physical damage to refrigerant lines.
Q7: How can I prevent future refrigerant leaks?
Regular annual maintenance that includes inspection of refrigerant circuits, timely replacement of aging components, and proper handling during service calls helps prevent leaks.
Q8: Which refrigerants can I use to recharge a system after a leak repair?
Only the refrigerant type specified on the equipment label. Never substitute or mix refrigerant types. SmartRefrigerants.com stocks all common HVAC refrigerant types for compliant recharging.
Conclusion
An HVAC refrigerant leak is a problem that demands proper attention not a temporary patch. The five steps covered in this guide recognizing signs, choosing the right detection method, diagnosing the cause and location, performing a proper repair, and correctly recharging the system represent the standard of care that protects equipment, serves customers, and complies with EPA regulations.
HVAC professionals who consistently execute these steps correctly build reputations for quality work that generates referrals and repeat business. For all refrigerant needs following a leak repair and recharge, visit SmartRefrigerants for fast-shipping, virgin-grade, EPA-compliant refrigerant in all major types.