One of the most common complaints that brings an HVAC technician to a job site is “the air isn’t cold enough.” Nine times out of ten, someone in the customer’s circle has already suggested “it just needs more refrigerant.” Sometimes they are right. But adding refrigerant to a system without accurately diagnosing whether it is low and why is one of the most common service mistakes in the industry. It wastes refrigerant, fails to address the actual problem, and can damage the compressor.
Checking HVAC refrigerant levels correctly requires more than reading a pressure gauge. It requires understanding what the pressures mean relative to the outdoor and indoor conditions, measuring superheat and subcooling to evaluate system charge accuracy, and knowing how to distinguish low charge from other problems that present with similar symptoms. This guide provides a complete, step-by-step technical walkthrough of the refrigerant level checking process.
Understanding What “Refrigerant Level” Actually Means
In an HVAC system, refrigerant charge is not measured by level the way water in a tank is measured. Refrigerant charge is the specific mass of refrigerant in the system, measured in pounds or ounces. The correct charge for a specific system is determined by the manufacturer and is stated on the equipment nameplate, in the installation manual, and in the service documentation.
An HVAC system that is low on refrigerant is not simply “low” in the way a water tank gets low. It has a refrigerant leak somewhere that allowed refrigerant to escape. Before adding refrigerant to any system, the leak must be found and repaired. Adding refrigerant to a leaking system without repairing the leak is a temporary fix that violates good service practice and, over time, releases refrigerant to the atmosphere in violation of EPA regulations.
Why Proper Diagnosis Matters Before Adding Refrigerant
A system can be “cold but not cold enough” for many reasons besides low refrigerant. A dirty air filter restricts airflow over the evaporator, reducing heat transfer. A dirty outdoor coil restricts airflow through the condenser, raising head pressure. A failing capacitor reduces compressor efficiency. A low voltage situation limits compressor performance. A failing metering device causes improper refrigerant distribution.
All of these conditions affect system pressures in ways that can look similar to low charge without manifold gauges and proper measurement techniques. Proper refrigerant level diagnosis rules out these other causes through a systematic process before reaching any conclusion about charge level.
Required Tools for Refrigerant Level Checking
Before beginning any refrigerant level check, ensure all required tools are present, in good working condition, and appropriate for the refrigerant type in the system. Required tools include manifold gauge set (digital or analog) rated for the refrigerant type, accurate thermometers (contact or infrared) for measuring air temperatures and line temperatures, a clamp-on ammeter for checking compressor amperage, a refrigerant identifier (if the system refrigerant is uncertain), and safety glasses and appropriate PPE.
Digital manifold gauge sets are strongly preferred for modern refrigerant level diagnosis because they provide real-time saturated temperature calculations based on the current pressure readings. This eliminates the need to manually look up pressure-temperature relationships and reduces the potential for reading errors. When working with a refrigerant like R-410A, the pressures are significantly higher than older refrigerants, making accurate gauge reading important.
Safety Checks Before Connecting Gauges
Before connecting gauges to any system, verify the system refrigerant type using the equipment nameplate or a refrigerant identifier tool. Never assume the system contains the original refrigerant improperly serviced systems may contain mixed or incorrect refrigerants. Using the wrong gauge set or service procedures for an unidentified refrigerant can be dangerous.
Verify that the manifold gauge hoses are in good condition with no cracks, worn fittings, or damaged cores. Worn gauge hoses can allow refrigerant to leak through small cracks, exposing the technician to refrigerant and potentially releasing refrigerant to the atmosphere. Replace any damaged hoses before proceeding.
Step-by-Step Guide to Checking Refrigerant Levels
Step 1: Gather Baseline Operating Conditions
Before connecting gauges, record the baseline operating conditions. Measure the outdoor ambient temperature at the condenser using an accurate thermometer. Measure the return air temperature (entering the evaporator) and the supply air temperature (leaving the evaporator coil). Record these values they are essential references for interpreting pressure readings and calculating superheat and subcooling correctly.
Allow the system to run for at least 15 minutes before taking any measurements. The system must be in steady-state operation for pressure readings and temperature measurements to be meaningful. Readings taken immediately after system startup do not reflect stable operating conditions.
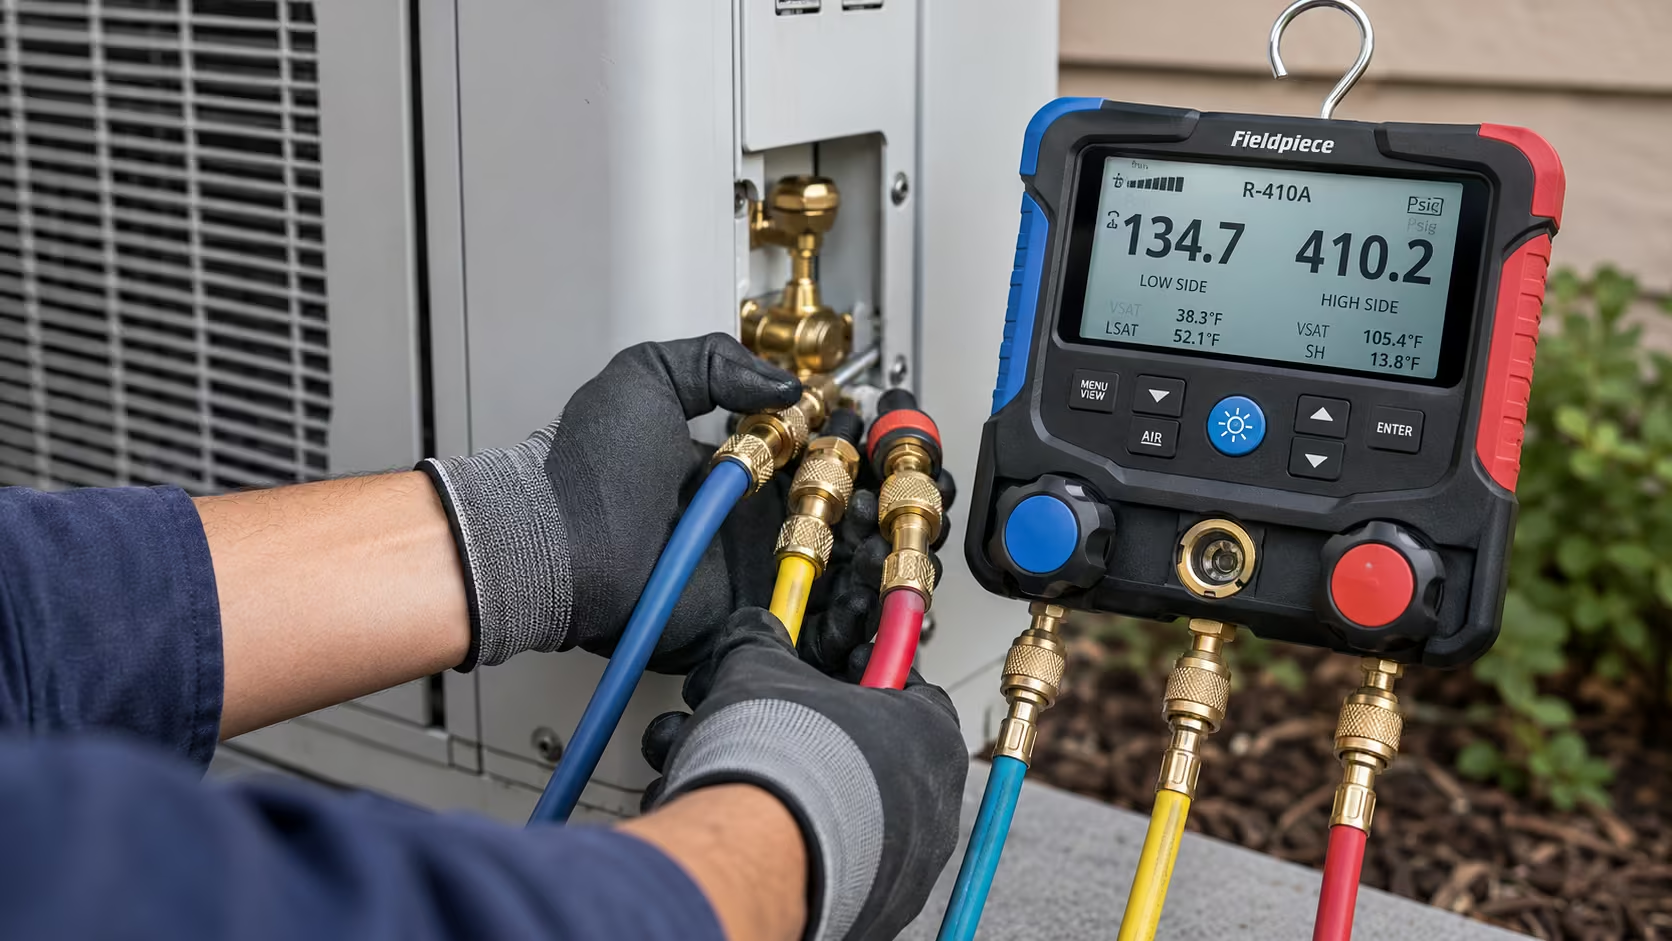
Step 2: Connect Manifold Gauges to Service Ports
Locate the service ports on the system. The low-side (suction) service port is typically on the larger-diameter suction line connected to the compressor. The high-side (discharge) service port is typically on the smaller-diameter liquid line. Connect the blue manifold hose to the low-side port and the red hose to the high-side port.
With the center (yellow) manifold hose connected to nothing or capped, slowly open the low-side manifold valve to allow the system pressure to equalize with the gauge. Then open the high-side manifold valve similarly. Read and record both pressures. Compare these pressures to the expected operating pressures for the refrigerant type at the current ambient conditions.
Step 3: Calculate Superheat for Fixed-Orifice Systems
Superheat is the temperature of the refrigerant vapor at the evaporator outlet above its saturated vapor temperature at that pressure. Superheat measurement is the primary diagnostic tool for systems with fixed metering devices (orifice tubes or capillary tubes). Proper superheat indicates the refrigerant is fully vaporized before leaving the evaporator, protecting the compressor from liquid slugging.
To calculate superheat: first, read the suction pressure from the manifold gauge. Convert this pressure to saturated vapor temperature using the pressure-temperature chart for the refrigerant being checked. Then, measure the actual temperature of the suction line at the service port using a contact thermometer or thermal clamp. The superheat = Actual Suction Line Temperature − Saturated Vapor Temperature.
For a properly charged residential system using a fixed orifice device, target superheat is typically 10°F to 18°F (5.5°C to 10°C) at standard conditions. Low superheat (below 5°F) indicates potential overcharge or refrigerant flooding back to the compressor. High superheat (above 25°F) typically indicates low charge or a restriction.
Step 4: Calculate Subcooling for TXV Systems
Subcooling is the temperature of the liquid refrigerant at the condenser outlet below its saturated liquid temperature at that pressure. Subcooling measurement is the primary diagnostic for systems equipped with TXVs (thermostatic expansion valves). Unlike fixed-orifice systems, TXV systems self-adjust superheat, making subcooling the more reliable indicator of proper charge.
To calculate subcooling: read the high-side pressure from the manifold gauge. Convert to saturated liquid temperature using the pressure-temperature chart. Measure the actual temperature of the liquid line leaving the condenser using a contact thermometer. Subcooling = Saturated Liquid Temperature − Actual Liquid Line Temperature.
For most residential TXV systems, target subcooling is 10°F to 20°F (5.5°C to 11°C). Low subcooling (below 5°F) may indicate low charge. High subcooling (above 25°F) may indicate overcharge. Compare findings to the manufacturer’s specifications for the specific equipment being serviced.
Interpreting Pressure Readings in Context
Pressure readings alone, without temperature context, can be misleading. High-side pressure is primarily influenced by outdoor ambient temperature and condenser airflow. Low-side pressure is influenced by indoor load, evaporator airflow, and refrigerant charge. Both pressures vary with operating conditions in ways that can look like charge problems when the actual cause is airflow or temperature.
A system with a dirty condenser coil will show high head pressure that looks like overcharge when viewed in isolation. A system with a dirty air filter will show low suction pressure that looks like low charge. Verifying that outdoor coils are clean and properly airflowed, that indoor filters are clean, and that indoor airflow is adequate is an essential part of the diagnostic process before concluding that a charge problem exists.
What to Do After Diagnosing Low Charge
If the diagnostic process confirms that the system is genuinely low on charge through consistent superheat, subcooling, and pressure readings that indicate under-charge after ruling out other causes the next required step is leak detection, not refrigerant addition. Find the leak first.
Leak detection methods include electronic leak detectors (heated diode or infrared), UV dye with UV light, soap bubble testing, and nitrogen pressure testing. The leak must be located and repaired before any refrigerant is added. After repair, the system should be re-evacuated to 500 microns or better before recharging with the correct refrigerant type and charge weight.
Smart Refrigerants supplies R-410A, R-407C, R-32, and other refrigerants for system recharging after confirmed leak repair and system restoration.
8 Frequently Asked Questions About Checking HVAC Refrigerant Levels
Q1: Can a homeowner check their own refrigerant level?
Homeowners cannot legally purchase regulated refrigerants or service refrigerant-containing equipment without EPA Section 608 certification. Refrigerant level checking and charging must be performed by a certified technician.
Q2: What does low refrigerant feel like from the customer’s perspective?
A system low on refrigerant typically cannot maintain the set thermostat temperature on hot days, may run continuously without reaching the desired temperature, and may eventually develop ice on the indoor unit as the evaporator gets too cold from a starved refrigerant flow.
Q3: How long does a proper refrigerant level check take?
A thorough refrigerant level check including baseline conditions, gauge connection, superheat/subcooling calculation, and airflow verification typically takes 30–60 minutes. Rushing the process leads to incomplete diagnosis.
Q4: Is it normal for an HVAC system to need refrigerant added every year?
No. A properly functioning system with no leaks does not lose refrigerant. If a system needs refrigerant added annually, there is a leak that must be found and repaired.
Q5: What is the correct superheat for an R-410A system?
For R-410A fixed-orifice systems, target superheat is typically 10–18°F at the service conditions. For TXV systems, target subcooling is 10–20°F. Always verify against the specific manufacturer’s documentation for the equipment being serviced.
Q6: Can you check refrigerant level without gauges?
Professional refrigerant level checking requires manifold gauges. While some informal observations (like ice on the indoor unit or warm air from registers) suggest possible charge problems, they are not diagnostic in themselves. Gauges and temperature measurements are required for accurate diagnosis.
Q7: What happens if you add too much refrigerant?
An overcharged system develops high head pressure, which stresses the compressor and can cause it to trip on the high-pressure safety switch. Overcharging also reduces system efficiency and can lead to liquid slugging that damages the compressor. Always charge by weight and measurement, not by guess.
Q8: What refrigerant is in my HVAC system?
The refrigerant type is printed on the equipment nameplate, typically on the outdoor condensing unit. Common residential refrigerants are R-410A (most systems installed 2010–2024), R-22 (older systems), and R-32 or R-454B (very new systems after 2026).
Conclusion
Checking HVAC refrigerant levels correctly is a fundamental service skill that separates professional technicians from technicians who simply add refrigerant and hope for the best. The systematic process of measuring baseline conditions, connecting gauges properly, calculating superheat and subcooling, and interpreting readings in context of the full system gives technicians the information needed to make accurate diagnoses and provide lasting service solutions.
Smart Refrigerants supplies the right refrigerants for professional recharging after accurate diagnosis and leak repair. From R-410A in 25lb cylinders to R-407C and next-generation options, quality refrigerant from a certified supplier is the right complement to professional diagnostic skills.